Creating Presentations
Microsoft PowerPoint 2000
A presentation graphics program lets you combine text, graphics,
and visual special effects into a professional-looking presentation. After
creating the presentation, you can deliver the presentation either by
color or black-and-white transparencies, 35mm slides, printed
handouts or fully automated-on-screen presentations.
What is different between PowerPoint 97 and PowerPoint 95?
Converting the presentation to HTML
Adding hyperlinks in the presentation itself (I did this in the
Martin Luther King presentation)
"Friendly" Office Assistant
More AutoContent Wizards - put in some choices and it will create
a good starting presentation for you.
Automatic Spell It
New Drawing Tools
Custom Show Feature - create mini presentations within one presentation
Kiosk presentations - "self" running presentations
What is different between PowerPoint 2000 and PowerPoint 97?
lets you convert the presentation to HTML so you can share on the web.
Now you do not need a viewer, you just use the normal html pages that
are created.
facilitate real-time collaboration by integrating two Microsoft
technologies - the NetShow server and NetMeeting conferencing
software.
more options for handouts
insert animated GIFS -- if you don't know what this is see my little
frog friend on the CS 104 Virtual Office.
more graphics optimization (means less space for storing and less time to draw)
Tutorial Objectives
There are many features to try out in PowerPoint. We are going to
cover most of the basics. Enough to get a "decent" presentation. By
the way, if you are already familiar with one Microsoft product,
many of the features will seem natural to you already!
Open and exit PowerPoint
Identifying components of the PowerPoint window
Selecting a template
Selecting a slide layout
Entering text
Entering clipart
Comparing the different PowerPoint views
adding special effects to a slide
printing the slides
executing a presentation
saving a presentation
PowerPoint Tutorial
- OPENING PowerPoint.
- Click the Start button.
- Point to the Programs in the menu that appears.
- Click the PowerPoint program menu item.
A title screen briefly appears, followed by a blank PowerPoint window and inside it
the PowerPoint Dialog Box. This initial dialog box provides shortcuts to creating
a new presentation or opening an existing one (see Figure Below)

- USING a WIZARD.
- Let's select AutoContent Wizard. It is the simplest way of creating a good
presentation. You have the Wizard and the Mr PaperClip to help you
- Click OK.
The AutoContent Wizard Window and the Office Assistant appears on your screen.
- YOUR OFFICE ASSISTANT
- Click on the Yes for help from the Office Assistant.
- Read the information in the windows. Note the steps that the AutoWizard will
help through. They are on the sidebar.
- Click Next.
- Now you see a list of buttons on the types of presentations that can be
given. Select Carnegie Coach. These are tips from Dale Carnegie
Training that provide you with tips on how to become a better presenter.
- From the list of available topics in the scrolling text window, select
Presentation Guidelines.
- Click Next.
- Select Presentations, informal meetings, handouts for the output options.
- Click Next.
- Select On-screen presentation and Yes for the presentation style.
- Click Next.
- Enter "Mastering Today's Software"as the Presentation title.
- Enter your name in the Your Name textbox.
- Enter Ball State University CS 104 Spring 2000 in the Additional Information textbox.
- Click Next.
- Click Finish. Note you can always go back and review your choices by the Back button.
Also these setting are not set in stone and can be changed later, as the Office Assistant reminded you
on the last slide.
- DIFFERENT VIEWS
- What appears on the screen is the Outline form of entering information. Take a look at the
organization. Notice that giving presentation is divided into four basic steps, plan, prepare,
practice and
present. In a smaller window you will see the design template for the slides.
- Lets switch to a different view, the Slide View. On the top menu bar go to View.
Select Slide. Now you will see one slide at a time. As I have told you many times before, there is
always another way to accomplish the same task. Take a look at the horizontal slidebar of the PowerPoint
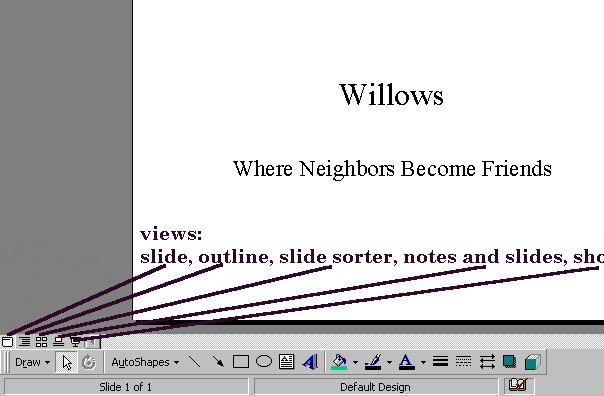
window. It is located right below the main window's Workspace. To the left of this slidebar, you will
see five buttons with icons on them. Note that the first one is highlighted. This is the icon for the
"single" Slide view.
The second icon is the icon for the Outline view, the view we had first. The third icon is the
Slide Sorter
view. The fourth icon is the Notes Page view. The fifth icon is to do the Slide Show.
(See figure below.)
Click on the first four buttons to see the different views of the presentation. In a
few steps we will get to the fifth icon.
- PLACEHOLDERS, ENTERING INFORMATION
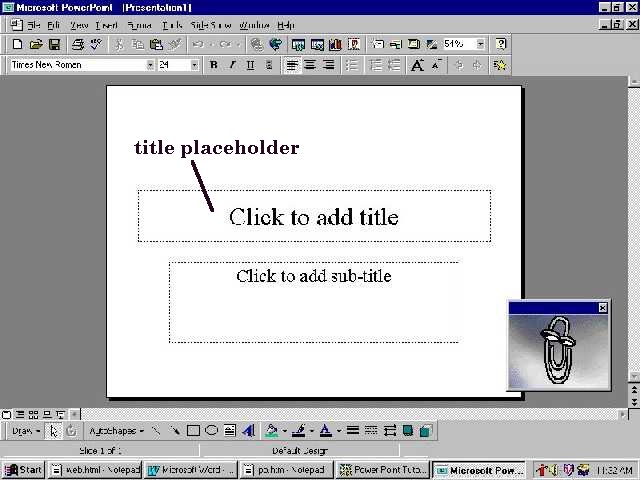
- Click on the title Mastering Today's Software. You have selected a placeholder.
A placeholder
is an empty object area that can hold a title, text, graphic, or other data. Depending on what type
of slide you have, title, bulleted list, etc., there will be an appropriate number of placeholders.
(See figure below.)
Each has a dotted-line rectangle. You need not fill every placeholder. An empty placeholder will
not appear on the slide during an actual presentation.
- Move the cursor to end of the word Today's and type in Productivity. You have
just learned how to insert and edit text for a presentation. It is that easy.
- At the bottom of the screen you have an information box that says, Slide 1 of 19. Yes, there are
already 19 slides. To see these one at time, use the double arrows located at the extreme right and
bottom of the window. Naturally, the double arrows pointing down move you to the next slide. The
double arrows pointing up move to the previous slide. If either of these conditions do not exist,
for example you are on the last slide and you click the down arrow, you get the
annoying beep.
- Click on the double downward arrows. Look at Slide 4 of 19. There is an extra diamond
on this slide. If you click on it you will find it also is a placeholder. Just like any other
placeholder, you can change the information in it or delete it entirely.
- Click on the double upward arrows. Look at Slide 2 of 19. Click on the text beginning with
words Delivering your presentations. Highlight the entire text within the placeholder.
Highlighting is a technique for selecting. When an object is highlighted, like an icon, we can
do this by merely clicking on it. However, when we wish to select portions of text, we must place
the cursor at the first character we want highlighted, press down the left mouse button and drag the
mouse over the characters we want to highlight. You do not release until you reach the end, then
release. Now the series
of letters (spaces) is highlighted. Now, either press the Delete key on your keyboard, or go up
and click on the Edit menu and select Cut.
- RUNNING A POWERPOINT SHOW
- Lets see what this presentation looks like when it is executed. Get back to slide number 1.
Now click on the slide presentation icon down on the left on the slidebar row. The whole screen is
taken up the slide. Just click the mouse's left button once to move one slide ahead.
To move back, place the mouse in the lower left-hand corner and you should see a small icon appear with
arrowheads. Click the left mouse button again, and a window appears with options on movement. Select
Previous. As expected, on the screen is the previous slide.
- If you didn't notice, there was also an option to End Show in the menu above.
However and easier method is
just to hit escape key. Hit the escape key to end the show. Now you see all the tools
and options again. Also in the workspace is the slide that you "escaped" on.
- MOVING SLIDES
- Lets get into Slide Sorter view. Click on the Slide Sorter button. (see number 21,
if you don't remember)
- On your screen you will see multiple miniature numbered slides and one of them is
highlighted to show the current slide.
- Click Slide 4 to select it. The rectangular indicator has now moved to the this slide,
showing that it has been selected.
- Click the slide and drag the mouse pointer so that it lies between Slides 2 and 3 and
release the mouse button. Wow, you have just changed the order of the slides with
one mouse movement. Pretty slick, if I should say so. The Slide Sorter view lives
up to its name. It is there to move slides around. It is also there to perform the same operation on
a number of slides.
- DELETING SLIDES
- Click Slide 3 to select it. Hold down the Shift Key and click on Slide 4 through 19.
You should see that all of these slide are now highlighted. Now go to the Edit menu and
select Cut You should see slides 3 through 19 disappear. Now you only have 2 slides left in your
presentation.
- SAVING A PRESENTATION
- Lets save now. Go to the file menu, select Save As, enter lab3 for the File name.
Make sure Save In textbox indicates the 3.5 floppy. Click Save.
- ENTERING MORE INFORMATION
- Double click on Slide 2. Double clicking on a slide in Slide Sorter view brings up
that slide in slide view.
- Click on the body of the slide (closer to the left edge, a little below the title placeholder.
You should see a larger placeholder come up. At the top of Workspace on the Formatting toolbar,
click the button with the bulleted list.
Hint: Do you have trouble determining all the types and names of toolbars? If so, when you are first
introduced to a new tool, on the the main menu they normally have a view. Click on it. See that one
of the options listed is toolbars. Click on it. There are 12 different toolbars available in
PowerPoint.
The checked ones, are the ones that are currently visible. Your can check and uncheck them at any time.
So if you don't know for example which one is the Formatting toolbar,
go to View->Toolbars and unselect or select and see the change.
- A white dot will appear in the upper left-hand corner. Type in the following list.
- Productivity Software
- Applications
To get a new bullet all you need to do hit the Enter key. If you want the text to remain with the same
bullet do not hit the Enter, the software will wrap the words for you.
- INSERTING A NEW SLIDE
- Click the Insert menu, choose the option New Slide.
A New Slide Layout window will appear. Notice the 24 layouts. (See figure below.)
Click on some of them and the text box
down at the bottom right hand corner will tell you which type you have selected. By the
way, if you have selected a layout, this does not mean that you can't change it later if you
like.
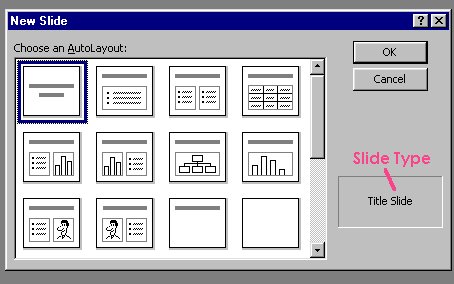
- Click the Clip Art & Text layout and click OK. A template of this Autolayout appears
on your screen with instructions.
- Enter "Productivity Software" for the Click to add title.
- Enter "Wordproccessing Spreadsheets Database Presentation
" for the Click to add text.
- Double Click on the placeholder where it says to Double click to add clip art. If
you have the categories, select the People at Work category. Pick any clip art that has to do with
people or computers. Double click on the one you like. NOTE: If you do not have this category,
select any clipart.
- The corners and sides of the object frame now display small squares, called resizing handles. You
drag the resizing handles by the mouse to alter the size of the image.
- Resize the clip art to fit the placeholder and perhaps drag it to make the slide look
proportional.
- Click the Insert menu, choose the option New Slide. Choose the Bullet List layout. For
the Title, type in Wordproccessing. Type in the following bulleted items.
- WYSIWYG
- Mark UP languages
- ADDING NOTES
- Click the Notes Page View Button. The fourth icon from the left in the group of five icons
at the bottom of the Window. See second graphic in this lab if you need to.
- CHANGING VIEW SIZE
- Click the text placeholder below the slide image. The insertion point appears, indicating that
it is ready to accept you text. If the insertion pont is small and difficult to see, increase the
view size. To change the view size, click the zoom list arrow located on the Standard toolbar.
A good size is about 66%.
- Type in :What You See is What You Get.
- ADDING SLIDE TRANSITIONS
- Next, go to Slide Sorter view. Highlight the first slide. At the top of window on the Slide Sorter
toolbar (the one with the icon of the small slide with the arrow on it on the left-hand side), you should
see a textbox with the text No Transition in it. Use the downward arrow to select any
transition you want. Do the same for the other two slides.
- Click on the Show icon. During the show do you notice the transitions you have selected.
- ADDING SLIDE EFFECTS
- Go to Slide Sorter view again. Highlight the second slide. At the top of window on the Slide Sorter
toolbar (the one with the icon of the small slide with the arrow on it on the left-hand side), you should
see a textbox with the text No Effect in it. Use the downward arrow to select any effect you
want. Do the same for the last slide.
- Click on the Show icon. During the show do you notice the effects you have selected.
- ADDING A CHART
- Go to slide view. Go to the last slide. Click the Insert menu, choose the option New Slide.
Choose the Chart layout. For the Title, type in Wordproccessing Popularity. Double Click in the Chart
placeholder. Notice a chart and a spreadsheet appear on your slide. Edit the spreadsheet to say the
year 1997,1998,1999 and 2000, instead of the labels 1st Qrt ... 4th Qrt. Just place the cursor in the
spreadsheet you wish to change and start typing. To get the chart updated just click inside the chart
placeholder.
- Click on the Show icon. During the show do you notice only the chart and title appear. When the show
ends you should be on the chart slide. To make the spreadsheet reappear, just double click
on the chart again.
- ADDING SLIDE FOOTERS AND HEADERS
- To customize your slides, note pages, or handouts with information, such as your company name
or product name, the slide number, the date, you can add headers and footers.
- To add headers and footers, click the View option on the menu bar, then click the Header and Footer
menu option. Click the Slide Tab if it is not already visible. Note the elements that can be
added automatically to your slides. Click on Date and Time
checkbox, so that a checkmark appears. Also make sure that Slide number is checkmarked.
Checkmark the Footer option also. Inside the textbox under the Footer option, type in the
text, CS 104. Now click on the tab Notes and Handout in the same window. Make sure Date and
Time, Header, Page Number, Footer are all checkmarked. For the textbox under Header, type in
practice slides, for the footer, type in CS 104. Now click Apply to All.
- SPELL CHECKING
- Click the Spelling button on the Standard toolbar. (The fifth icon from the left, the one with
an ABC and checkmark on it.) PowerPoint begins to check the spelling in your presentation. It
will check the spelling the Notes Pages, even if you are in another view. Fix any spelling errors.
A message will appear indicating that spelling check is complete. Click Close to exit the
spelling.
- Save now. Go to the file menu, select Save As, the information should be correct from
the previous Save As. Make sure Save In textbox Indicates the 3.5 floppy. Click Save. Exit
PowerPoint. Either you can pull down the File Menu and highlight Exit, or you can simply
click the Window exit button (the last button with the X).
- Opening an Exiting Presentation
- Start PowerPoint again. Click the Open an Existing presentation radio button in the PowerPoint
startup dialog box, then click OK.
- Click the Look in list arrow, then locate the A: drive.
- Click the A: drive.
- In the Look in the list box, click Lab3. Now click Open. You should see your presentation again.
- Drawing and Modifying Objects
- To the end of the tutorial presentation, add a slide with only a title.
- Choose Insert, Picture, WordArt.
- Select the fifth style in the top and press enter.
- Type -- The End. ( into the place your text here). Hit OK.
- Resize the WordArt to Expand to the entire page.
- Add a few stars to this slide. Click the Autoshapes button on the
Drawing button on Drawing toolbar and select Stars and Banners.
(The toolbar is normally located at the bottom of the screen.)
- Save now. Go to the file menu, select Save As, the information should be correct from
the previous Save As. Make sure Save In textbox Indicates the 3.5 floppy. Click Save. Your homework
will continue with this presentation.
- Hand in a copy of your slides to obtain lab points. Print the slides as a handout. Click on the
File Option. Go to the Print option. Make sure the the Print Range specifies All. In the text box:
Print What: Click the arrow and select Handouts (6 slides per pages). Then
click Ok.
- Now you can close PowerPoint.
To receive full credit for today's lab, be sure to hand in to your lab instructor the 6 per page
handout of today's presentation before you leave. For homework, you will update this presentation
as specified on the lab 3 homework assignment. Please see handout.