CS 104 Lab 1
Part 1A - Everyone
Working with Windows 95/98/NT
Microsoft Windows 95/98/NT is a powerful operating environment that enables you to access the power of DOS without memorizing DOS commands and syntax. Windows 95/98/NT uses a graphical user interface (GUI) so that you can easily see on-screen tools that you need to complete specific file and program management tasks. The three products 95, 98 and NT all share the same graphical user interface. So working with anyone at this level will see no difference. It is under the hood, in resource management and security where you start seeing differences.
Starting Windows 95/98/NT
In most cases, you will not have to worry about this. If a computer is installed with Windows 95/98/NT and it is shut down and then you turn it on again, the computer will start up Windows 95/98/NT automatically. Most of our labs, the computers will be already on, so you will not even have to worry about this.
Difference between a lab computer and a home (dorm room) computer is that a lab computer is usually set up with some identification or login screens right at the beginning. After these initial login and confirmation screens, all standard installed Windows 95/98/NT will look the same. If necessary, turn on your computer. It will run the boot program. You should see the Enter_Network_Password box. Type
in RB355 at the USER_NAME entry. Confirm that the DOMAIN is CS. No password is necessary to login in RB355 or 356. Click the OK button. When necessary, click the OK button again. What you see is the Windows 95/NT interface, that part of the In-Charge program that is designed to interact with you
Program icons that were created during installation (such as My Computer, Recycle Bin, and Network Neighborhood) are displayed on the desktop. Other icons may also appear, depending on how the system was set up. Shortcuts to frequently used objects (such as documents, printers, and network drives) can be placed on the desktop. The taskbar appear along the bottom edge of the desktop. The Start button appears at the left end of the taskbar.
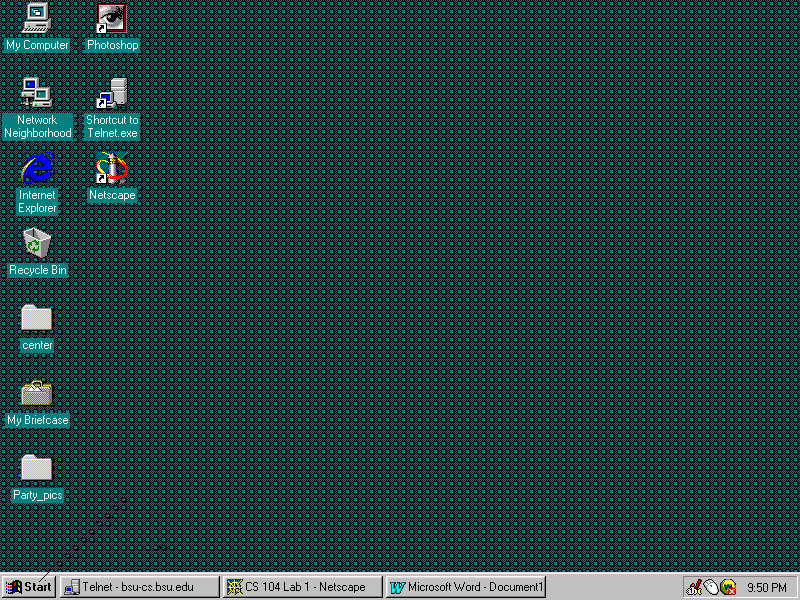
Identify
desktop,
wallpaper,
icons,
the task bar
and the start button.
Using the mouse:
Windows is designed to be used with a mouse, so its important that you learn how to use a mouse correctly. With a little practice, using a mouse is as easy as pointing to something with your finger. You can use the mouse to select icons, to make selections from pull-down menus and dialog boxes, and to select objects that you want to move or resize
- Pull-down menus- Menus that cascade downward into the screen whenever you select a command from the menu bar.
- Dialog box A window that opens on-screen to provide information about the current action or to ask the user to provide additional information to complete the action.
In the Windows desktop, you can use the mouse to
- Open windows
- Close windows
- Open menus
- Choose menu commands
- Rearrange on-screen items, such as icons and windows
The position of the mouse is indicated on-screen by a mouse pointer. Usually, the mouse pointer is an arrow, but it sometimes changes shape depending on the current action
There are four basic mouse actions:
- Click.
To point to an item, and then press and quickly release the left mouse button. You click to select an item, such as an option on a menu. To cancel a selection, click an empty area of the desktop. Unless otherwise specified, you use the left mouse button for all mouse actions.
- Double-Click
. To point to an item, and then press and release the left mouse button twice, as quickly as possible. You double-click to open or close windows and to start applications from icons.
- Right-Click.
To point to an item, and then press and release the right mouse button. This opens a Context menu, which gives you a shortcut to frequently used commands. To cancel a Context menu, click the left mouse button outside the menu.
- Drag.
To point to an item, then press and hold down the left mouse button as you move the pointer to another location, and then release the mouse button. You drag to resize windows, move icons, and scroll.
Understanding the Start Menu
The Start button on the taskbar gives you access to your applications, settings, recently opened documents, the Find utility, the Run command, the Help system, and the Shut Down command. Clicking the Start button opens the Start menu. Choosing the Programs option at the top of the Start menu displays the Program submenu, which list the program folder on your system. Program folders are listed first, followed by shortcuts. When the Start menu is open, moving the mouse pointer moves a selection bar through the menu options. When the selection bar highlights a menu command with a right-facing triangle, a submenu opens. Click the shortcut icon to start an application. If a menu command is followed by an ellipsis (
), clicking that command opens a dialog box.
The above configuration is of a normal installation of Windows 95/98/NT. Note that not all computers will have a Start button. It depends on the way they were installed and maintained by people who have control over them. If there is no start button, the only way to interact with the system is through the icons provided on the desktop.
Identifying the Elements of a Window
Everything opens in a window. Applications, documents, and dialog boxes all open in windows. For example, double-clicking the My Computer icon open the My Computer application into a window. Because window elements stay the same for all Window applications, this section uses the My Computer window for illustration.
Title bar Across the top of each window is its title bar. A title bar contains the name of the open window as well as three buttons to manipulate windows. Going from left to right, the minimize button reduces a window to a button on the taskbar, the maximize button expands windows to fill the desktop, and the close button closes the window.
Menu bar Gives you access to the applications menu. Menus enable you to select options that perform functions or carry out commands. A File menu in My Computer, for example, enables you to open save, and print files.
Some menu options require you to enter additional information. When you select one of these options, a dialog box opens. You type in the extra information, select from a list of options, or select a button. Most dialog box have a Cancel button, which closes the dialog box without saving the changes; an OK button, which closes the dialog box and saves the changes; and a Help button, which opens a Help window. To see a dialog window: Click the start button, highlight Find
and release. A Find dialog box will appear. There is named field in which you supply the name of file you want to find. Type in *.doc. Another field with the text Look in is also in this window. Click on the down arrow key and highlight the choice that say C:. Now click the Find Now button. You should experience it looking through files.
Scroll bar appear when you have more information in a window that is currently displayed on screen. A horizontal scroll bar appears along the bottom of a window, and a vertical scroll bar appears along the right side of a window.
Window border identifies the edge of the window. In most windows, it can be used to change the size of a window. The window corner is used to resize a window on two sides at the same time.
Manipulating Windows
- Maximize a window Click the maximize button on the title bar
- Minimize a window Click the minimize button on the title bar. Even though you can not see the window anymore, the application stays loaded in the computers memory.
- Closing a window Clicking the close button on the title bar. Exits the program, removing it from memory.
Arranging Windows
- Right-click the taskbar and choose Tile Horizontally.
- Right-click the taskbar and choose Tile Verticlly.
- Right-click the taskbar and choose Cascade
- Click and drag the windows title bar to move the window around the desktop
- Click and drag the window border (or corner) to increase or decrease the size of the window.
Part 1B
Either you will be following the lab instructor and his/her instruction
on Web Mail or VAX MAIL
you will be using the permanent marker to mark your name on your
data cds. Be sure to mark only the written side!
If you are an experienced email user you may explore on your own
the game of Solitaire and/or pinball on these computers.
If you have the skill to send and receive messages using VAX MAIL or Web mail,
you must still send a message to your lab instructor! See the Section listed Assignment.
Please exit Solitaire when asked.
Part 1C - E-Mail
WEB MAIL
Freshmen who went through Orientation this year have been given accounts
on the new Microsoft Exchange server. Eventually, we will all be
given accounts on this system, so it is important to know how to use it.
All you need to use this new system is a Web Browser (Netscape or Internet
Explorer).
-
Start your web browser. Start Menu -> Programs ->Internet Explorer (or
Netscxape Communicator) -> Internet Explorer (or Netscape Navigator)
-
In the location bar at the top of the window, type http://webmail.bsu.edu
-
Press ENTER.
-
Now click on the Microsoft Outlook logo.
-
A dialog box will appear.
-
Type in your VAX username, and password, then click OK.
-
Your mailbox will appear.
VAX MAIL
The program we want to use, MAIL, is not on your computer. It is on
a different computer that many people can use at once, called the VAX.
You must get connected to that computer to use the program.
To connect to VAX display the Start menu again. Follow the Telnet -> Vax
path. Then follow the on screen instructions with me. (On some computers
the telnet program is not found from the Start menu, but is an icon on
the deskdop.) You will not see your password as you type it. This computer
has a very different interface. Here we must type our commands.
We use a program called MAIL to exchange messages. To run the MAIL program:
at the $ prompt, type
MAIL (and hit the return key) You will be sending a mail message
to lab instructor. The message should include your name and the time and
section number of the lab.
To send a messages in MAIL: type SEND and hit the return key.
At the To: Type the VAX username.
at the Subject: Type a short phrase that describes the message.
This section is for the body of your message. As you type, press the
enter key when you get close to the right side of the screen. Follow the
on screen instructions to complete your message.
Other Mail Commands:
There are times that we read a message in our mail box that we just
want to reply to. To reply to a sent message:
Type REPLY (hit the return key) to reply to message. Follow the
rest of the instructions on the screen.
Sometimes you want a physical copy of a message that you can take home
with you, called a hard copy. To ask the VAX to print a copy of your message
on a printer on the first floor: type P/QUE=P_RB and hit the return
key. Please do not repeat this command! Don't worry when nothing happens
up here, your message will come out in room RB134. Every computer lab will
have a specific P/QUE command. If you do not see it displayed on a wall
of the lab, kindly ask an assistant for the correct print command.
You will be notified of a new message when it comes in. To read your messages:
press the enter key to read the new message.
The sender and subject of each message is kept in a list called a directory.
To look at a listing of your messages: type DIR and press the enter
key. You may now reread any message by typing its message number and hitting
the enter key.
Messages take up space. You should delete messages when you no longer need
to refer to them. To delete your messages: when your message is on the
screen, type DEL and hit the enter key.
Look at the listing of your messages. How are messages marked?
When you are finished using a program, you leave it. To exit Mail:type
EXIT and hit the enter key.
Deleted messages still take up space. To reclaim your space, compress your
mail file: type CM and hit the enter key.
To stop using the VAX and return control to Windows 95: type LO
and hit the enter key.
Close the window.
OTHER E-MAIL SYSTEMS
There are many sites on the Internet that offer free e-mail,
for example, Hotmail http://www.hotmail.com, and Netscape Webmail
http://webmail.netscape.com. These sites are nice, and they
give you a permanent e-mail address. They are all similar, and you
can check them out if you like.
Part 2
Netscape's Communicator / Microsoft's Internet Explorer (IE)
Some programs may be started from the desktop. Netscape Communicator and
Internet Explorer are programs called
a browser that will allow you to explore information
that is made available to you on many computers through out the world.
Today we will see some pages about Ball State and pages for specifically
for this course.
On the desktop find and click on the Netscape Communicator/IE icon. You should
now be on our Computer Science home page. You see the heading Computer
Science Faculty on your screen, and our address appears in the Location
box. Identify the menu bar, the toolbar, the location box, and the hot
links buttons (if they are on your screen).
See what happens to your cursor when you put it over one of the blue(red)
words. Such a word contains a hyperlink, a path to a location in
the same or a different document
If you click on the link you will take the path! Use the arrows on the
far right to scroll down to a black bar with words on it. Put your cursor
over the word Home in our CS home page. (Not the icon HOME!) Click
your mouse button to move to the BSU's home page.
You see a message from our BSU President. Use the arrows on the far right
to scroll down to a black bar with words on it. Click MAP to see a map
of Muncie.
Find the Home button on the toolbar, not the word Home on the black bar.
Click on it to return to the CS home page. You may return to the CS home
page at any time by pressing this button for the computers in RB355. Each
computer system has a different home, just like each one of you have a
different home!
The text in the Location window is the address of the document you are
examining. The address is also called a URL, a Uniform Resource
Locator. It is good to keep a notebook page to record the URLs of sites
you would like to revisit.
Write the URL of the CS home page here: ______________________________
Find Dolores Zage listed in CS Faculty. Click on her name. You should now
be on Professor Zage's home page. Click on the hyperlink for CS 104. Any
information that you could possibly want for CS 104 can be found through
the links listed on this page.
Write the URL of the CS Virtual Office here: ______________________________
Exit the Communicator program.
Welcome to the World Wide Web
If you have done much web surfing at all, you've probably noticed that
addresses on the Web (URL's) look pretty funky. So what does all
that stuff mean anyway? Computers connected to the internet are called
domains, the address you type into your browser tells what domain (computer)
you want to connect to. For example, the URL for Ball State is www.bsu.edu
let's take a closer look at this address:
www.bsu.edu
This is the name of a computer here at Ball State University. The
www tells us that it is a web server (the computer that stores websites),
the bsu tells us that it is at Ball State University, and the .edu means
that it is an educational institution. All domain names in the United
States follow this convention, in addition to .edu for educational institutions,
there are several other domain types:
-
.com - Commercial
-
.gov - Government agencies
-
.org - Non-profit corporations
-
.net - Private user groups
-
.mil - Millitary sites
Countries also have their own special abbreviations that are used on the
Web. For example:
-
.us - United States
-
.uk - United Kingdom
-
.ca - Canada
-
.au - Austria
-
.oz - Australia
-
.de - Germany
-
.fr - France
-
.it - Italy
-
.nl - The Netherlands
-
.jp - Japan
-
.ch - Switzerland
EXITING
When your lab instructor dismisses you, you need to free the computer
for the next user. From the Start menu choose Shut Down. Choose Close
all programs and logon as a different user and press the Yes button.
Assignment:
Note: to obtain all of the points from today's lab you must
Be here during your assigned time.
Send email to the lab instructor from the VAX.
Hand in your printed copy of your lab instructor's reply to your email
at the beginning of our next lab.
Additional assignments:
BRING 3 HIGH DENSITY DISKS or A ZIP DISK TO LAB NEXT WEEK. We will format them in lab.